Instructional Design Rubric Descriptions
This page has detailed descriptions of the standards in the final project rubric for ASTE 7090: Instructional Design for Distance Education at Utah State University. Last updated April 13, 2023.
1. Course Overview and Introduction
The course overview and introduction set the tone for the course, let learners know what to expect, and provide other guidance to help learners get off to a good start. The standards in this section cover the syllabus (or similar), course introduction, and instructor introduction.
Description:
It should be clear what and who the course is for.
How to meet this standard:
Do any of the following:
- Have a course syllabus or “About This Course” page that provides an overview of the course and course goals that explain to the learners what they’ll get out of the course.
- Have a statement about the purpose of the course on the course main page.
Examples:
- Teaching Online (from UC Davis)
- As soon as you open this course, there’s a statement about who the course is for and what learners will get out of it.
- POLSC101: Introduction to Political Science (from Saylor Academy)
- This course has both a welcome blurb on the main page and a syllabus that includes an introduction to the course and learning outcomes.
Description:
It should be clear what the course covers.
How to meet this standard:
Do any of the following:
- Have a course syllabus or “About This Course” page that provides a course schedule with course topics.
- Have all course topics visible from the course main page (from day 1 of the course).
Description:
It should be clear how the course is paced (self-paced versus new content released by the instructor or based on prior activity completion) and how the course is delivered (entirely online and asynchronous, combination of online and synchronous virtual or in-person).
How to meet this standard:
Do all of the following:
- Explain or make it clear how content will be released.
- Explain if the course is entirely online and asynchronous or if there are synchronous meetings that are required or optional for learners.
Description:
When learners arrive on the course main page, it should be clear where to begin.
How to meet this standard:
Do any of the following:
- Use sequenced numbering for topics to indicate what to look at first. For example, “Week 1, 2, 3…,” “Step 1, 2, 3,” “Module 1, 2, 3.”
- Have a course “tour” on the main page. For example, a short video orientation to the course can work well.
- Have a clear statement about how to get started at the top of the main course page.
- Have a “Start Here” or “Read Me First” page at the top of the course.
Description:
Learners should know who is behind the course, whether this is a single person (an instructor) or a group (like a campus office).
How to meet this standard:
Do any of the following:
- Have a written, audio, or video instructor introduction.
- Briefly describe and link to the office / group behind the course.
Description:
Learners should know who to contact or what to do if they have questions about course content or logistics.
How to meet this standard:
Do any of the following:
- Have a course syllabus that includes the instructor contact information and contact information for various student support services.
- Have contact information in the course footer or sidebar.
- Have a routinely monitored “Course Questions” discussion area where learners can ask questions.
- Explain on a per-topic or per-assignment level what learners can do if they have questions about the specific content.
Description:
It should be clear how learners will be evaluated, what materials, technologies, or skills learners need to have, and how learners are expected to engage with the course content, fellow learners, and the instructor.
How to meet this standard:
If the course is something nonformal, like a workplace training:
At the top of the main course page or in a page that’s linked towards the top of the course, explain:
- If the training is required.
- How it will be determined that learners have completed the training.
- Estimated time to complete the training.
- How long learners will have access to the training.
- Anything learners are supposed to do or have before getting started. For example, should learners have access to a specific tool/technology? Should they be familiar with a particular process?
If the course is something formal, like a college course:
In the course syllabus, explain:
- Expectations for student communication. For example, should students include a specific subject line in their emails?
- The policy on late work and resubmissions.
- How assignments and participation will be graded.
- Expectations for prerequisite knowledge and skills. For example, if there are several writing assignments in the course that will require students to cite in APA format, you’ll want to include information / links about APA format.
- Required technology/tools. You should also include the reason the technology is required to help students determine if what they have will be adequate or not. For example, instead of just “microphone and webcam,” you might say something like, “microphone and webcam to use in virtual class meetings.”
2. Instructional Materials
Instructional materials are the resources and content in your course. This includes content you write, videos you make, and links to any external readings, videos, and websites.
Description:
Learners should be able to easily determine the purpose of all instructional materials used in the course.
How to meet this standard:
Do all of the following:
- Distinguish between required and supplementary or recommended content.
- Explain what to do with provided content.
- Make it clear when content that’s provided in multiple formats contains the same information.
- Make sure the method of presenting information contributes to the usefulness of the information. For example, a drag-and-drop game might be a useful way to present categorical information (like this Young Learners vs. Adult Learners Matching Game), but it would not be a useful way to present your navigation (like this Genetics FAQ Menu).
Examples:


Description:
Content should be varied to keep learners engaged and to accommodate different ways people prefer to learn. You need at least 3 ways of presenting information. You can think of “ways” as the medium (e.g., image, text, video) or the display (e.g., dropdown, flowchart, slideshow). It should be very easy to meet this standard without thinking about it too much.
How to meet this standard:
Choose 3 of the information presentation examples listed below. The list doesn’t include all possible options, but it’s pretty comprehensive.
| Method | Description | Examples |
|---|---|---|
| Advance organizers | Advance organizers are tools that help learners focus their attention when learning new information. | |
| Branching scenarios | Branching scenarios are “choose your own adventure” type activities – the information learners see depends on previous choices. Many games/simulations would be considered “branching” lessons. | |
| Dropdowns, accordions, and tabs | Dropdowns, accordions, and tabs are all ways of displaying information in a collapsible/expandable way. These methods are useful if there’s information that may not apply to everyone (such as FAQs) or if the outline of information is what’s most important and the additional details are there to provide context (e.g., steps in a process). | |
| Fancy lists | By “fancy” list, I mean bulleted or numbered lists that have visual elements that make them look functionally different – like having borders or background colors on the list items, having the list in columns, etc. | |
| Flip cards | Flip cards can be used to are basically an alternative to tabs – they’re a way of presenting a small amount of information at first but with access to more information (on the back of the card). They can also be used in the traditional flash card sense with questions and answers. | |
| Flowcharts | Flowcharts are a good way to visually represent a process, especially one that has multiple decision points with associated branches. | |
| Graphs, charts, and diagrams | Graphs, charts, and other diagrams are a good way to visually show numbers – just make sure you choose the right type of chart for the data so nothing is misrepresented. | |
| Image hotspots | Image hotspots are clickable areas overlaid on an image that, when clicked, reveal additional information or take the user to another location or page. | |
| Infographics | I use the term “infographic” broadly to just mean some visual way of representing information. | |
| Images | Images can be a great way to engage learners, as long as they’re germane to the content. | |
| Podcasts and other audio recordings | Podcasts and audio recordings can be a good way to connect with learners (something about hearing the instructors voice in an online setting can go a long way). You can also include external podcasts. | |
| Screencasts and voiceovers | Screencasts are digital recordings of a computer or mobile device screen that capture audio narration and demonstrate a process. Voiceovers are similar to screencasts but are usually standalone audio recordings that may accompany visuals or presentations but do not necessarily show a screen recording. Both are useful when teaching a process, software, or app. | |
| Slideshows | Slideshows can be traditional slide decks that students download or watch online or online sliders/carousels. | |
| Timelines | A timeline is a visual representation of chronological events or milestones. | |
| Videos | Like audio, videos of the instructor are a good way to connect with learners. Videos made by other people can also be useful for supplementing text. | |
| Virtual field trips and 360-degree media | 360-degree images and videos are an excellent way to transport learners to different locations. You can make your own or find some that someone else has already made. |
Description:
There should be an introduction at the start of every new module. This can be anything from a few sentences to introduce the topic or something lengthier. Introductions can be text, video, or audio.
How to meet this standard:
Do all of the following:
- Have at least one sentence at the start of each module that explains what the module covers and/or what learners will learn or do in the module.
- Compose the introduction for the learner (i.e., address the learner directly). So instead of saying something like, "This week, students will learn about ..." do "This week, you will learn about ..." or "This week, we will learn about ..."
Description:
Original content is anything you (or the instructor) creates. Curated content is anything created by someone external to the course. For example, a weekly overview written by the instructor would be original content and links to videos to watch would be curated content.
How to meet this standard:
Pretty self-explanatory. Create some content and link to some content. The exact ratio of original to curated is up to you. I find instructors usually go too far towards the curation side and neglect to provide their own content. You should at least provide some narrative for the topic and context for external resources like readings, videos, and slide decks.
Description:
All non-original content should be appropriately used and referenced according to copyright and intellectual property rules.
How to meet this standard:
Do all of the following:
- Only using images and creative works you are allowed to use (and in the way you’re allowed to use them).
- Cite or include links for quotes or non-original content.
- If there are specific citation rules for learners, the instructor should be held to the same standard.
Description:
The materials should represent up-to-date thinking and practice in the discipline.
How to meet this standard:
Do all of the following:
- Ensure that the information you’re including represents the latest thinking (for example, if you’re reworking a course, do some Googling to verify that the information you have is still accurate).
- Use the latest external resources (as possible within cost and access constraints).
- If a resource is included that’s more than 10 or so years old, it’d be good to acknowledge that and say why it’s being included (for example, it may be the most accurate source for the specific information).
Description:
“Chunking” is the process of breaking down the course content into manageable pieces.
How to meet this standard:
Do all of the following:
- Break content into individual modules / topics that follow a logical and progressive sequence. This usually comes naturally with the type of content (for example, starting with basic information then delving into more complex information), but if you need some ideas, see 10 Ways to Organize Instructional Content.
- Use clear headings to help students see the organization and sequencing.
- Use bulleted and numbered lists – what can be bulleted usually should be.
- Use plenty of headings that accurately describe the information that follows.
- Keep paragraphs short (about 100 words max).
- If you have video lectures, either break them into smaller (less than 10 minute) pieces, make them searchable, or include chapters so learners can jump to different places in the video.
- Pepper content with images, short videos, games, audio recordings, practice quizzes, and other multimedia that can reduce working memory demands.
Description:
The quantity and pacing of content should be whatever makes sense for your learners and the course. For example, standard undergraduate courses carry an expectation of 3 hours per credit per week. So a 4 credit fully online undergraduate course would equate to 12 hours per week. You want to make sure that the weekly readings, activities, assignments, etc. can be completed within that time limit.
How to meet this standard:
Determine how much time learners should be spending in each module. This could be based on the credits of the course (if that applies) or your expectation for the maximum time learners will want to spend on a module (I wouldn’t go more than an hour per module). Then have someone (or multiple people) go through your module while timing themselves to see how long it takes and adjust from there. You can also estimate reading time of the content using the Read-O-Meter.
3. Activities and Assessments
Activities and assessments are different (assessments are meant to provide feedback to the learner and/or the instructor on their progress and proficiency and activities are meant to facilitate learning and reinforce understanding of a particular concept), but I’ve grouped them together because these standards have to do with tasks that learners do and – with a few exceptions – actually submit. This submission could be to the instructor, to their peers, or to the computer (in the case of an auto-graded quiz). Assessments that are not typically submitted (i.e., the exceptions) are things like self-reflections and self-evaluations.
Description:
Anything that learners DO (in most cases this means anything learners submit) should align to the course goals, the topic-level objectives, or serve some other purpose like fostering community.
How to meet this standard:
Do all of the following:
- Use the best type of assignment for the purpose of the assignment. For example, a discussion forum should generally not be used to answer questions that have a correct answer. A quiz (or assignment) would be more appropriate.
- For everything that learners submit, ask yourself, “why is this important?” and/or “how will this show that learners know what they need to know or can do what they need to be able to do?” If you have trouble answering that question, you probably need to rethink the assessment.
Examples:
Examples of alignment between a learning outcome and an activity:
- An essay or discussion shows learners can “explain” or “describe” something.
- A multiple-choice quiz verifies that learners can “define” or “identify” vocabulary.
- An activity shows that learners can “write” or “compose” a composition.
- A video of a learner presentation in a foreign language shows that learners can “speak” or “translate” a foreign language.
- Participation in a game reveals learners can “analyze” and “evaluate” complex factors and “make good decisions” that allow progress through the game.
Examples of lack of alignment between a learning outcome and activity:
- The outcome is to “write a persuasive essay,” but the activity is a multiple-choice test.
- The outcome is to “create a body of work that illustrates your photographic vision,” but the activity is a 25-page thesis about contemporary photographers.
Description:
Assessments should be varied to keep learners engaged and to accommodate different ways people prefer to learn. You need at least 3 types of assessment. For example, you want more than just multiple-choice quizzes or discussion forums.
How to meet this standard:
Ensure at least 3 different kinds of assessments are in the course. Some ideas are in the resource links below.
Resources:
- Creating Better Auto-Graded Assessments (from Amy Spielmaker)
- These are some ideas for creating better automatically graded assessments (basically, better quizzes).
- eLearning Examples (from William Horton)
- This page has several ideas for creating content ("Absorb" activities), engaging activities ("Do" activities), and meaningful assessments ("Connect" activities).
- Index of Training Exercises (from Skills Converged)
- I'm not going to lie – this website is not great design-wise. But if you can get past the ugliness, there're some really good (and unique) ideas here.
- Online Instructional Activities Index (from the University of Illinois)
- This is a really useful list of assessment and activity ideas, especially if you're building a completely online course where you want the students to interact with each other.
- Assess Teaching & Learning (from Carnegie Mellon)
- Good resources on assessments, especially assessing students' prior knowledge.
Description:
You should avoid, or at least minimize, the measurement of knowledge, skills, and abilities that are not relevant to what you’re actually trying to measure. These are called construct-irrelevant factors. Minimizing construct-irrelevant factors provides a more precise understanding of what learners are truly acquiring in terms of the knowledge, skills, and abilities they need for the specific topic.
| Assessment Example | Construct Irrelevant Factors |
|---|---|
| Math assessment that includes word problems to assess students’ understanding of math concepts. | The ability to read fluently is construct irrelevant. Even though it is an important skill, it is not part of the construct being measured. Learners who have difficulty with reading may miss certain items even though they may have a good grasp of the underlying math concepts. |
| Essay exam in a biology class that is both timed and closed book. | Construct-irrelevant factors include motor coordination (handwriting or typing skills), short-term and working memory, organization and time management, attention, and the ability to work under pressure. The additional measurement of these many factors can prevent gaining an accurate picture of a student’s Biology content knowledge. |
How to meet this standard:
Do any/all of the following (ideally, you will do most or all of the following throughout the course, but you only need to provide evidence of one):
- Don’t grade on construct irrelevant factors. For example, if students are submitting a video reflection and what you’re trying to assess are things like critical thinking, making connections to course content, etc., don’t put something like “video quality” on the rubric.
- Provide supports to reduce the measurement of construct-irrelevant factors. For example, providing an audio description of a math question so reading ability is not being measured in an assessment of content knowledge in mathematics.
- Include information on prerequisite knowledge, skills, and technology. For example, if there’s an activity to make an infographic and you’re not assessing learners’ ability to find infographic tools, you should provide links to infographic tools in the assignment.
- Give learners a choice in submission format. For example, “You can upload your reflection as a 500-word paper, a 3-minute video, or a 3-minute audio recording.”
- Give learners a choice in assignment. For example, “You can analyze the coverage of a current news story, select a cultural value and examine its treatment in the media, or create a media message.”
Description:
Learners should be able to read the assignment instructions and know what to do, how to do it, and when to do it. All course instructions should be clear, findable, consistent, well written, free of ambiguity or error. Additionally, instructions should be in the voice of the instructor and set the tone for course interactions.
How to meet this standard:
Do all of the following:
- Include steps for how to complete the activity.
- Include acceptable methods for completing the activity (if it’s not clear). For example, is it open book, what’s an acceptable submission format, can learners work together?
- Include time expectations (due date and/or estimated time to complete the activity).
- Address the learners directly (e.g., “In this assignment, you will…” vs. “In this assignment, students will…”).
Description:
Keeping learners actively engaged with the instructor, the content, and each other can help promote their success. Your course should ideally involve all these types of interaction: instructor to learner, learner to learner, and learner to content interaction. Depending on your learners and context, you may have more of one type than another.
How to meet this standard:
Do several of the ideas from this page on interaction and feedback. In the “Evidence and Comments” rubric column for this standard, you might need to explain what will happen if it’s not apparent from the course. For example, feedback is a type of instructor-learner interaction, so you might say something like, “I plan to provide students with personalized audio, video, or text feedback on all activities that pertain to their final project.”
Description:
Learners should know ahead of time how their work will be evaluated. For non-formal courses, this will be less about grading and more about showing or explaining the goal.
How to meet this standard:
Do any of the following:
- Provide a rubric.
- Provide a less-formal “How this will be graded” section.
- Provide examples of excellent work.
- Providing detailed feedback throughout an assessment (for example, allowing learners to get feedback on quiz answers before it’s submitted for a final grade or allowing retakes).
- Any other method that tells or shows learners what they need to do to be successful.
4. Design and Layout
Design and layout refer to the way the course is visually presented and organized. A well-designed course will be easy to navigate and will use clear and concise language. The layout should also be visually appealing and consistent.
Description:
Navigation refers to the process of planning, controlling, and recording the movement of a learner from one place to another in the online course. Navigation throughout the course should be consistent, logical, and efficient. Some of this is determined by your platform. But you can help make your course structure easier to navigate by doing the things listed below.
How to meet this standard:
Do all of the following:
- Clearly label essential course components like “Announcements,” “Syllabus,” and “Course Questions.”
- Use sequenced numbering for topics and/or pages. For example, “Week 1, 2, 3…,” “1.1, 1.2, 1.3…”
- Write easy-to-understand, self-describing, and meaningful text for headings.
- Write easy-to-understand, self-describing, and meaningful text for links.
- Minimize the number of clicks students have to do to get places.
- Have a page that provides links to each top-level topic page (in most cases, this should be your course homepage though you could have a separate “Modules” page).
- Ensure all links work and go where they’re supposed to.
Resources:
- Course Organization Tips
- These are some slides I did for a webinar. They cover how to make your course more organized and easier to navigate.
Description:
A consistent layout and design should be used throughout the course, making content, instructional materials, tools, and media easy to locate. Design elements should be used repetitively, increasing predictability and intuitiveness.
How to meet this standard:
Do all of the following:
- Use the same style for headings throughout the course.
- Use the same colors throughout the course.
- Use icons consistently.
- Be consistent with how you include multimedia and external resources. For example, consistency in whether videos are embedded or externally linked.
- Consistently sequence topic overviews, content, learning activities, and assignments.
Resources:
- Online Course Consistency Tips (from Vanderbilt)
- This page essentially covers what's in the "how to meet this standard" list above, but it provides some additional explanation.
Description:
You should make sure that the appearance of the things on the page—all of the visual cues—accurately portray the relationships between those things: what’s most important, what thing are similar, and what’s part of what. This is called visual hierarchy and it’s the main way to guide learners through your content.
How to meet this standard:
Do all of the following:
- Ensure that the more important something is, the more prominent it is.
- Make things that are related logically related visually.
- Visually nest things to show what’s part of what.
Examples:
- Text Box Designs
- These are examples of ways to style important information to make it more prominent (better than bolding, capitalizing, and italicizing everything). You can copy/paste the HTML into your LMS to replicate the style.
- Video Grid
- These videos have their associated summaries in gray boxes, all styled consistently to indicate their relationship. You can copy/paste the HTML into your LMS to replicate the style.
- Quotes in a Box
- In this design, bullets are clearly indented under each title as an example of visual nesting.
Resources:
- Video Overview of Visual Hierarchy
- This is a video I made with some examples of what to do and what not to do.
- Steve Krug on Creating Effective Visual Hierarchies
- In this excerpt from Don't Make Me Think, usability expertSteve Krug explains how the appearance of the things on the page should accurately portray their relationships.
Description:
It can sometimes be difficult to match a topic to a particular style, but you shouldn't have designs that obviously conflict with the course tone or subject. This is an example of mismatched style and subject. The pink background of this presentation’s slide title does not match the tone of the subject (which is marijuana).
How to meet this standard:
Do several of the ideas from this video on visual design and style.
Description:
Conventions are your friends. One of the best ways to make almost anything easier to grasp in a hurry is to follow the existing conventions – the widely used or standardized design patterns. Some examples in your everyday life: street signs, controls in cars, and yes, websites. People expect things to be located in certain places (for example, navigation at the top or on the left and page titles at the top) and to look and work a certain way (for example, a magnifying glass icon to indicate search ability).
How to meet this standard:
Do all of the following:
- Don’t misuse icons. These are icons that have commonly accepted functions (so shouldn’t be used outside of the identified contexts):
Icons and their conventional (commonly accepted) actions Icon Commonly Accepted Action (rightwards triangle)Play (two vertical lines)Pause (three horizontal lines)Open a menu (two diagonally crossing lines)Close, No, Incorrect, Remove, "Don't Do This", or Times (multiplication) (checkmark)Yes, Correct, Done, or "Do This" (two right angle lines)Open or Add (three horizontal dots)See More (three vertical dots)See More (downwards carat)Open (magnifying glass)Search or Zoom - Don’t use contradicting icons and colors. For example, don’t use a red checkmark (because red usually means “no” and a checkmark usually means “yes”).
- Use icons consistently. For example, if you use a lightbulb to icon to designate tips, don’t then switch to having it designate reminders.
NOTE: There’s more to conventions than icons, but that’s where I commonly see conventions go awry in instructional materials.
Description:
The course design should facilitate readability and minimize distractions.
How to meet this standard:
Content:
Do all of the following:
- Ensure there are minimal editing and proofreading errors (spelling, grammar, punctuation, word choice, syntax).
- Avoid using scans and pictures with text in them.
Layout:
Do all of the following:
- Ensure you have adequate white space (but not too much that it makes it difficult to read).
- Ensure your text and multimedia is aligned.
- Avoid center aligning text, images, and other objects. It’s not like things should never be centered, but it can look unanchored and sloppy.
Font Family:
Do all of the following:
- Do not use multiple similar fonts from the same font family. For example, do not use Calibri and Arial (both sans-serifs).
- Avoid excessive use of "fancy" fonts (scripty font, slab serifs, handwriting, papyrus, comic sans).
- Use a max of two fonts. By two fonts, I mean two different fonts (e.g., using Open Sans and Open Sans Bold is still using one font; using Arial and Times New Roman is using two fonts).
- Do not change fonts at random (for example, changing from Arial to Calibri midway through your document).
- Avoid excessive use of capitalization, bolding, and/or italics.
Text Size:
Do all of the following:
- For webpages: At least 14px for body text (stick with the defaults in your LMS and you should be good to go).
- For documents: At least 11pt for body text.
- For slides: At least 18pt for body text (if the slides are going to be distributed vs. presented, you can get away with smaller fonts though I wouldn’t go below 12pt on slides).
Line Height:
Do all of the following:
- For body text: Somewhere between 1.2 and 1.7 (depends on the font)
- For headings: Somewhere between 0.9 and 1.4 (depends on the font). When text is all-caps, line height should be closer to 0.9.
Heading Spacing:
Do all of the following:
- Ensure headings have more space above them than below them (usually best if it’s about double the space above as below). For example, 16 pt. spacing before and 8 pt. spacing after. This is so you don’t have “floating headings” (when a heading is equidistant to the text above and the text it’s a heading for).
Color:
Do all of the following:
- Use a dark text color (black or dark gray) and a light background color for most body text. Text that's used less often than body text (like headings and table headers) can be non-grayscale. For example, dark orange headings.
- Avoid using using dark backgrounds and light text for text that’s more than a few lines. Text that's used less often than body text (like headings and table headers) can be light with a dark background. For example, table headers with white text and a dark orange background.
- Limit materials to 3 text colors. And please no neon colors. Same goes for backgrounds.
- Avoid excessive use of color or super bright (neon) colors for large areas (vs. just an accent).
Resources:
- Video Overview of Alignment
- This is a video I made that shows how alignment is used to make things look more polished and readable.
- Video Overview of Typography
- In this video, I cover choosing and styling fonts.
- Video Overview of Color
- This is a video I made on using color effectively and with accessibility in mind. I also go over tools for finding color schemes and putting text over images in a way that makes the text readable.
Description:
Multimedia used as a vehicle for content or feedback (e.g., graphics, audio, animation, video, and interactive components) should be easy to use and of reasonably professional quality.
How to meet this standard:
Do all of the following:
- Ensure graphics have adequate resolution (but aren’t too large). I recommend 1000-2000 pixels on the longest side (though you can get away with smaller if the picture will be small on the screen). I also recommend using a tool like TinyPNG to compress images (make them smaller) without losing quality.
- Ensure videos have adequate resolution (but aren’t so large that they don’t stream smoothly). In most cases, I recommend 1280x720.
- Ensure visuals (graphics and videos) have the correct aspect ratio. Most graphics you find online or built-in to a tool (like the MS icons) will default to the correct aspect ratio. Your task then is to lock that aspect ratio and not squish the visuals or stretch them out. With video, test your setup to ensure what comes out isn’t squished or stretched.
- Ensure any audio is easy to hear.
- Avoid using tools that requires learners use a specific browser, operating system, or download a specific software to view/interact with the multimedia (unless strictly necessary).
- Ensure multimedia is viewable/usable across different screen sizes. The media may look different (for example, menus might be condensed), but it should provide an equivalent experience.
5. Accessibility
All course materials, activities, and assessments should be accessible. This means all learners can easily navigate and interact with course components across input methods (mouse and keyboard), senses (hearing and seeing), or technology (assistive device, computer, and mobile device).
Description:
All audio (contained in videos or standalone) should be accessible to learners who are D/deaf or have difficulty hearing (and for overall improved usability for everyone). This usually means captions and/or transcripts.
Captions are the text version of audio elements in a video (spoken words, sound effects, music) that are timed to synchronize with the audio and (ideally) include speaker identification. Captions can be open or closed (closed captions can be turned on/off, open captions are always visible).
Transcripts are the text version of audio. Similar to captions, there are best practices (see resources below). My advice: If using an external source (e.g., a podcast), do your best to find one that has a transcript (most do). If you make your own audio recording, just provide the text version of what you said in a dropdown near audio or in an external document that's linked. This is easy if you started with a script and only deviated a small amount.
How to meet this standard:
Do all of the following:
- Ensure all videos have accurate closed or open captions (closed captions can be turned on/off, open captions are always visible).
- Ensure all audio recordings have accurate transcripts.
How accurate do my captions / transcript need to be?
The industry standard for captioning and transcript accuracy is 99%. This means the captions/transcripts are accurate both in content and punctuation, spelling, grammer, and, in the case of captions, timing. For the purposes of the final project, I will accept 90% accurancy. Even with this accuracy level, the automated captions from any platform will not be sufficient. You will need to edit all automatically generated captions. I am not going to be counting your errors and measuring your accuracy, but it is pretty apparent when captions and transcripts have not been edited for accuracy.
Resources:
- Making Audio and Video Media Accessible (from W3C WAI)
- This page explains how to make media accessible, whether you develop it yourself or outsource it.
- Video Captioning Style Guide (from the University of Melbourne)
- This is a comprehensive guide to follow for correctly captioning your video. It's from a university in Australia, but what it covers is still applicable to the U.S.
- Tools for Creating Caption Files (from DCMP)
- If you publish videos on a platform that does not generate captions (like Kaltura), you'll need to create your own caption file that you can then upload to the video. The page above lists some options for doing this.
- Top Tips For Captioning Like A Pro
- This article has some practical and brief tips on making better captions.
Platform-Specific Guides:
Description:
When visuals convey meaning (meaning they provide necessary information and should be read by screen readers), you must have an alternative way for learners to access this meaning. Types of visuals that will almost ways convey meaning include (1) any visual that contains text. I recommend avoiding images that contain text when possible (not just for accessibility, but because the text tends to look low resolution) and (2) graphs, charts, and diagrams. Other visuals (like photos) may convey meaning, but it’s less certain (see standard 5.3 for guidelines on making decorative visuals accessible).
How to meet this standard:
Do any of the following:
- Add alternative text that presents the same content and function of the image.
- Add a caption for the image.
- Provide a link to a text version of the image.
- Structurally associate the image and an adjacent long description.
- Include an audio description of the image.
Resources:
- When to Describe
- Not sure if your graphic needs a description or if it's just decorative? This is a decision tree for figuring that out.
- Alternative Text Info from WebAIM
- This article is specific to webpages, but the same rules for alt text content apply to documents and slides.
- Adding Long Descriptions for Complex Images
- This page from W3C WAI explains how to describe images that require more than a short phrase or sentence (like graphics with text in them, charts, diagrams, and maps)
- Complex Images for All Learners: A Guide to Make Visual Content Accessible
- This PDF includes how-to’s for making complex images (like pie charts, graphs, flowcharts, diagrams, and maps) accessible.
Platform-Specific Guides:
Description:
When visuals are purely decorative (meaning they add visual interest but do not provide necessary information and should be ignored by screen readers) OR when the content of the image or object is present in the surrounding text (and therefore can safely be ignored by screen readers), they should be marked in a way that tells screen readers not to announce the image.
How to meet this standard:
Do all of the following:
- For decorative visuals online (i.e., in HTML): Use empty alt tags (alt = "").
- For decorative visuals in MS Word: Select the "mark text as decorative" option in the Alt Text pane.
- For decorative visuals in MS PowerPoint: Select "mark text as decorative" option in the Alt Text pane OR put the image/object is on the slide master OR apply the image as the slide background.
- For decorative visuals in Google Docs and Apple Pages: There’s no option to mark as decorative and there doesn't seem to be one single best practice: some say do "" for the description (pair of empty quotes), some say put referencing information in the alt text, for example "screenshot for step 2," and then some say leave the alt text blank. Since there doesn't seem to be a clear benefit to doing either of the first two options and the "leave it blank" option is the easiest, that's what I'd do.
- For decorative visuals in Google Slides and Apple Keynote: There’s no option to mark as decorative so you can either do what’s described above for Google Docs / Apple Pages OR place the image or object in the slide master OR apply it as a slide background.
- For decorative visuals in PDFs: Mark images as artifacts in Adobe Acrobat Pro.
Description:
Not all users and devices can perceive color, so information communicated solely through color can be lost. So, information conveyed with color must also be communicated textually to be effective.
How to meet this standard:
If color is needed to convey meaning, ensure there is a text alternative for that meaning as well.
Resources:
Each of the sites below have good alternatives for using only color.
Description:
People with low vision often have difficulty reading text that does not contrast with its background. This can be exacerbated if the person has a color vision deficiency that lowers the contrast even further. Ensuring a minimum contrast ratio between text and it’s background can help make the text more readable for these people and everyone else.
How to meet this standard:
Do all of the following:
- Ensure all normal (body) text has at least a 4.5:1 color contrast ratio with the background.
- Ensure all large (heading/title) text has at least a 3:1 color contrast ratio with the background.
- Avoid putting text over a background image that has a lot of contrast in it.
Resources:
- WebAIM’s Color Contrast Checker
- Use this tool to check the contrast between foreground text and the background.
- WebAIM’s WAVE extension
- The WAVE tool will run an automated check on webpages. One of the checks is for adequate color contrast.
- How to Use the Accessibility Checker in PowerPoint and Word
- The Accessibility Checker will tell you if you have low color contrast in your slides/document.
Description:
It should be clear what text/elements are clickable (links and buttons) and which are not.
How to meet this standard:
Do all of the following:
- Only underline text that’s a link.
- Ensure the color of clickable text/elements is different from the color of non-clickable text/elements.
Examples:


Description:
Link text should tell the user where the link goes. Imagine you were scanning a page (or email) and only reading the links. You want them to make sense independent of the text around them.
How to meet this standard:
Do all of the following:
- Don’t use full URLs for link text.
- Write link text that makes sense out of context (do not use things like “click here” as link text).
Examples:


Description:
Any content that is organized as a list should be created using the list controls that are provided in the authoring tool. Most authoring tools (Word, Pages, Canvas, Moodle, etc.) provide one or more controls for adding unordered lists (with bullets) and ordered lists (with numbers). Properly tagged lists allow users of screen readers to scan and navigate the content of a page. When screen reader users enter a list, their screen reader informs them that they’re on a list and may also inform them of how many items are in the list, which can be very helpful information when deciding whether to continue reading.
How to meet this standard:
Do all of the following:
- Use the list controls provided in whatever tool you’re using to create content. If you’re working online and aren’t sure if something is a list, switch to HTML view and look for the appropriate list tags (<ul> or <ol> and <li>).
- Ensure lists are not broken up. If you’re working online and aren’t sure if something is a list, switch to HTML view and ensure all the related list items (<li>) are encased in the opening (e.g., <ul>) and closing (e.g., </ul>) list tags.
Description:
Ordered lists are used to present information that has a specific sequence (like a recipe or steps in an assignment). Unordered lists are used for information that does not have a specific sequence. A good way to check is to rearrange the list items and see if it changes the meaning. If it does, then it should be an ordered list. If it doesn't, then it should be an unordered list.
How to meet this standard:
Do all of the following:
- Use numbered lists for steps.
- Use bulleted lists for related, but not sequenced, information.
Description:
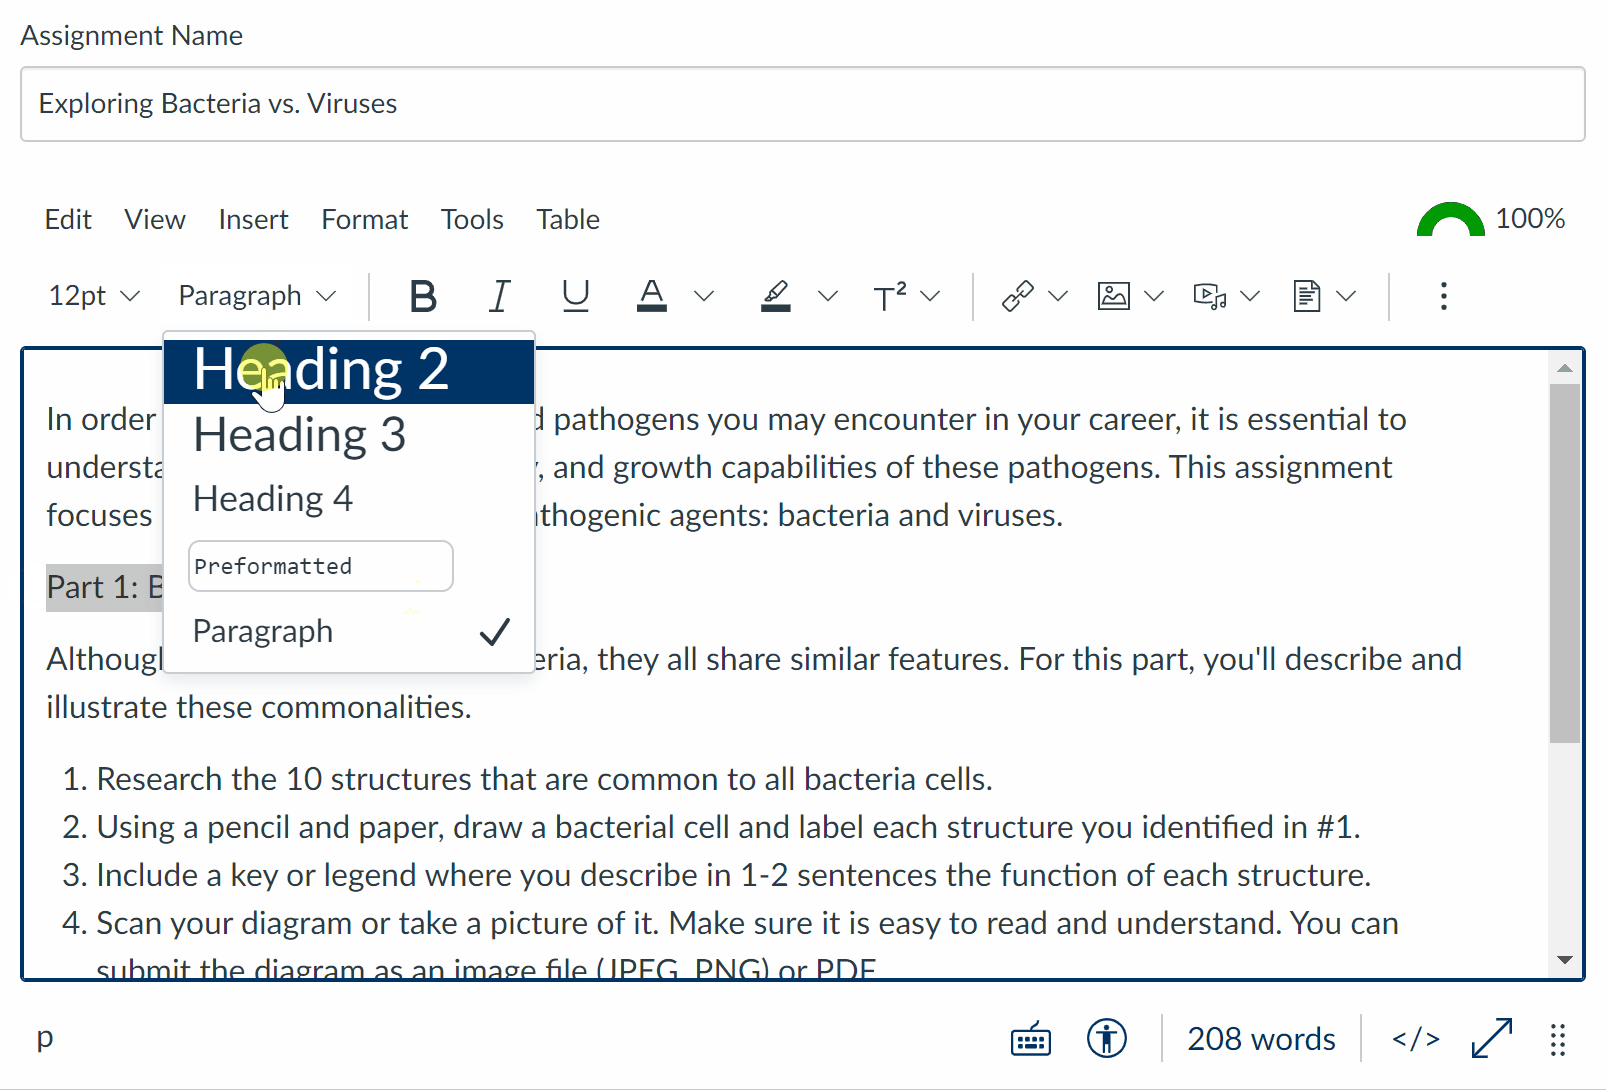
Headings make content easier to navigate. Rather than looking at a wall of text, when we have headings, we can more easily find what we’re looking for without expending too much energy searching. People who can't see the page content can still use headings to help scan and navigate the contents of a page because screen readers (and other devices) allow users to listen to a list of headings and choose which section to go to, like a table of contents. But this only works if the headings are actually tagged as headings.
How to meet this standard:
Use the heading controls provided in whatever tool you’re using to create content. If you’re working online and aren’t sure if something is a heading, switch to HTML view and look for the appropriate heading tags.
Examples:
Play GIF

Play GIF
Description:
Headings should be sequenced and nested by their rank (or level). The most important heading is Heading Level 1, and the least important heading is Heading Level 6. Headings with an equal or higher rank start a new section, headings with a lower rank start new subsections that are part of the higher ranked section.
The first heading on your page (usually the title of your document) should be Heading Level 1. Then work your way down from there. On webpages, usually the page title is Heading Level 1. This means the first heading you should actually add to the page in the editor should be Heading Level 2. Though this varies by the platform. For example, in Moodle, the site name is Heading Level 1 and the page title is Heading Level 2, meaning the first heading you should be adding is Heading Level 3.
I find it helps to think of your headings as an outline, or table of contents. That makes it easier to know what should be part of what (and therefore a lower heading level).
How to meet this standard:Do all of the following:
- Nest heading levels to correctly indicate new sections and subsections.
- Don’t skip heading levels (for example, don’t go from heading level 2 to heading level 4).
Example:
This is an example of what the headings might be in a syllabus. You can see the way they’re visually indented, it’s clear what the document is – it’s a syllabus for HE 420, and it’s clear that each of the indented subsections is part of the item above it. For example, “Learning Outcomes” are learning outcomes for this course and it’s clear that “Quizzes,” “Weekly Assignments,” “Group Presentation” and “Happiness Project” are all “Assessments”.
- Heading 1 (<h1>) HE 420: Healthy Relationships
- Heading 2 (<h2>) Instructor Information
- Heading 2 (<h2>) Course Description
- Heading 2 (<h2>) Learning Outcomes
- Heading 2 (<h2>) Course Requirements
- Heading 2 (<h2>) Expectations
- Heading 2 (<h2>) Assessments
- Heading 3 (<h3>) Quizzes
- Heading 3 (<h3>) Weekly Assignments
- Heading 3 (<h3>) Group Presentation
- Heading 3 (<h3>) Happiness Project
- Heading 2 (<h2>) Tentative Schedule
- Heading 2 (<h2>) Policies
- Heading 3 (<h3>) Grading
- Heading 3 (<h3>) Late Work
- Heading 3 (<h3>) Academic Integrity
- Heading 2 (<h2>) Student Support Services
- Heading 3 (<h3>) Accommodations
- Heading 3 (<h3>) Technology Support
- Heading 3 (<h3>) Mental Health
Description:
Paragraphs have semantic meaning. Line breaks do not have semantic meaning. In other words, a paragraph that’s tagged as a paragraph will be interpreted as such by assistive technology. When line breaks are used to create visual spacing, the line breaks are essentially ignored by assistive technology – the content will be read as a single paragraph.
TIP: In Word, you can click the paragraph icon (¶) to show formatting marks, which makes it easy to see where there are new paragraphs (you’ll see a ¶ at the end of the line) versus a line break (you’ll see a ↵ at the end of the line).
How to meet this standard:
Do all of the following:
- Use paragraph tags for new paragraphs and not line breaks. In other words, press enter or return to start a new paragraph, not shift + enter or shift + return (which will create a line break, not a new paragraph).
- Only use line breaks when the separation is purely for visual purposes. In other words, only use line breaks if it would be acceptable for the content to be contained in the same tag. For example, line breaks in headings can be useful because you don’t want to break a single heading into multiple heading tags, but you might want to move the text onto two lines for visual reasons.
Description:
Adding or removing space above or below elements should be achieved through paragraph spacing (if working in a document) or margin/padding (if working online). This is instead of just pressing enter or return a couple times to add space and instead of just using a line break when you want to reduce space.
How to meet this standard:
Online Content (i.e. HTML)
Do all of the following:
- Ensure there are no empty tags. For example, delete any empty paragraph tags (<p> </p>).
- Remove space above/below elements by changing the margin. For example, to remove the space below a paragraph tag: <p style="margin-bottom: 0;">I will have my bottom margin removed.</p>
- Add space above/below elements by changing the margin or padding. For example, to add more space above a heading: <h3 style="margin-top: 30px;">I will have more space above.</h3>
Documents
Do all of the following:
- Ensure there are no empty tags. In Word, you can click the paragraph icon (¶) to show formatting marks, which makes it easy to see empty tags. Any line that has a ¶ by itself is an empty tag that should be deleted.
- Add or remove spacing above/below text using the paragraph spacing controls.
- Start content on a new page using a page break (not just adding a bunch of empty lines).
Slides
Do all of the following:
- Ensure there are not empty tags. In PowerPoint, you can see most empty lines by going to the Outline View.
- Add space above/below elements by using separate placeholders or using the paragraph spacing controls.
Description:
Screen readers read the elements on a page in the order they are added to the page, which might be very different from the order in which things appear visually. To make sure everyone reads the contents in the order you intend, it’s important to check (and fix) the reading order.
How to meet this standard:
Do all of the following:
- For webpages: Try navigating through your web page using the keyboard alone: Start by refreshing the page. Then, using the tab key, verify that you can access all links and controls in a predictable order based on their visual position on the page. You can also use WebAIM’s WAVE extension to check for the correct reading order.
- For slides: First convert any SmartArt in the slides to shapes (SmartArt is not tab-able) and ungroup objects (unless the grouping is necessary). Then try navigating through your slide: Start by clicking outside the slide. Then, using the tab key, verify that every object is selected in the order the slide should be read. This usually means the slide title is selected first then the main content from top, left to bottom right. PowerPoint has a built-in Reading Order Pane you can use to verify and fix reading order.
- For tables in slides and documents: Do not merge cells and ensure tables have correctly marked column and row headers (see standard 5.16).
- For objects in slides and documents: Ensure all objects (pictures, icons, shapes, tables, drawings) are positioned in-line with text.
- For PDFs: In Adobe Acrobat Pro, verify the reading order is correct in the Order Panel: go to View > Show/Hide > Navigation Panes > Order. See more about tab and read order in PDFs.
Description:
Tables should be used for presenting data, not for changing the visual layout of the page.
How to meet this standard:
Do all of the following:
- Only use tables for presenting information that’s related across rows and columns.
- Do not use empty cells for formatting. The solution is usually to use separate tables.
- Do not merge cells.
Resources:
- When to Use Tables and How to Make Them Accessible to Screen Reader Users
- This page does a good job of covering when to use a table and when to use some other type of element (usually a list).
Description:
Wherever tables are used, they should be accessible. This means correctly marking header rows, columns, footers, and captions.
How to meet this standard:
Do all of the following:
- Ensure all tables have a header row – both in content and tag.
- Ensure all tables either have a caption (the prefered method in HTML) or alt text (suitable for documents and slides) that identifies what's in the table.
- Ensure tables whose first column is used as a “label” for what follows in cells to the right also have a tagged header column.
- Ensure tables that have a row that summarizes (usually sums) the data are marked as having a total row (or use the table footer tag).
Platform-Specific Guides:
- Canvas: Making Accessible Tables
- Moodle: Making Accessible Tables
- HTML: Accessible Tables Tutorial
- MS Word and PowerPoint: Making Accessible Tables
- Apple Pages and Keynote: Making Accessible Tables.
- Google Docs and Slides: Using Grackle Add-Ons for Tagging Tables
- PDFs (Adobe Acrobat Pro): Making Accessible Tables
Description:
PDF tags provide a hidden, structured representation of the PDF content that is presented to screen readers. They exist for accessibility purposes only and have no visible effect on the PDF file. There is more to an accessible PDF file than tags, but an untagged PDF would not be considered accessible.
NOTE: PDFs are notoriously inaccessible and unpleasant to remediate (remediate = make accessible). Whenever possible, create your content online – HTML is the most accessible way to communicate information.
How to meet this standard:
Do all of the following:
- Begin with an accessible document before converting to a PDF. If you have an accessible document (or slides) and then convert it to a PDF, you should be in good shape – the PDF will be accessible, including being tagged. See Converting Documents to PDFs for more info.
- Use Adobe Acrobat Pro to verify the accessibility of your PDF and fix any accessibility issues. If your document was accessible before being converted to a PDF, you’ll probably only have a couple things to fix in Adobe Acrobat Pro. If your source file was not accessible (or if you are not the original creator of the PDF and are unsure of its accessiblity), you can use Adobe Acrobat Pro to fix the accessibility issues.
Resources:
- Creating Tagged PDFs
- This guide from UW goes over tagging PDFs using Adobe Acrobat Pro.
- Adobe Acrobat Pro and Accessibility
- This guide from WebAIM has detailed instructions for using Acrobat Pro’s accessibility features.
Description:
Individuals who use a screen reader skim slide titles to navigate; they can quickly scan through a list of slide titles and go right to the slide they want. Using unique slide titles allows them to clearly understand which slide they are on.
How to meet this standard:
Do all of the following:
- Ensure the slide title is using the title placeholder.
- Use the Accessibility Checker in PowerPoint to ensure all slides have unique titles. This means each slide has different text in the title placeholder.
- For slides that have spill-over information, instead of using the same slide title, do something like “[name] 1 of 2” or “[name] continued.”
PowerPoint Tips:
- If you don't want the title to be visible on the slide (but still readable by screen readers), you can hide it by clicking the eyeball in the selection pane. See how to make a slide title invisible.
- If you created your slides without using the correct placeholders, you can retroactively mark the text you want to be the title as a slide title. See how to use the Accessibility ribbon to title a slide.